Blackened Salmon

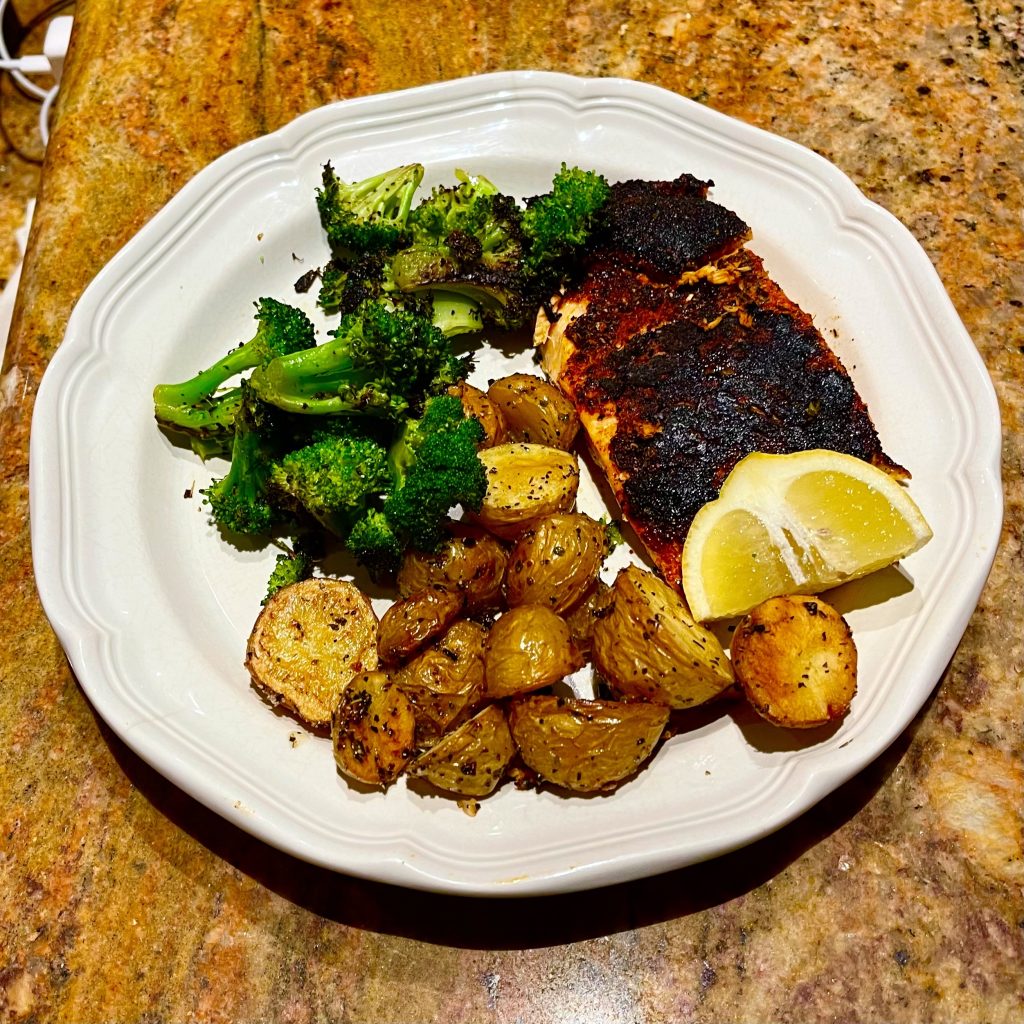
We love Salmon in our house, and we have a variety of ways to prepare it. Blackened salmon is one of our favorites, and I would say we eat it twice a month! It’s spicy, and such an easy preparation. If you make extra spice mixture, then there’s hardly any work at all in the preparation when you make them the next time.

You can buy salmon fillets from your market. This may sound crazy, but we love the Costco frozen salmon farm-raised salmon fillets. They are so easy, and with just 1 hour of soaking them in water, we are ready to make this any time. I know fresh is better, and we do that sometimes too, but this is a great recipe, whether you use fresh or frozen fillets. I think one of the keys to finishing the salmon is a liberal lemon squeeze on it when you plate it. It makes it sparkle and you can taste the difference.

Enjoy! – Mike

Ingredients

2 tbsp Paprika (I used Smoked Paprika)
1 tbsp Black Pepper (Course is better than Shaker Grind)
2 tsp Brown Sugar
1 tsp Kosher Salt
2 tsp Garlic Powder
2 tsp Onion Powder
1 tsp Cayenne Pepper
1 tsp Oregano
1 tsp Thyme
4 Salmon Filets
Butter or Olive Oil
1 Lemon, Cut into wedges for squeezing

Directions

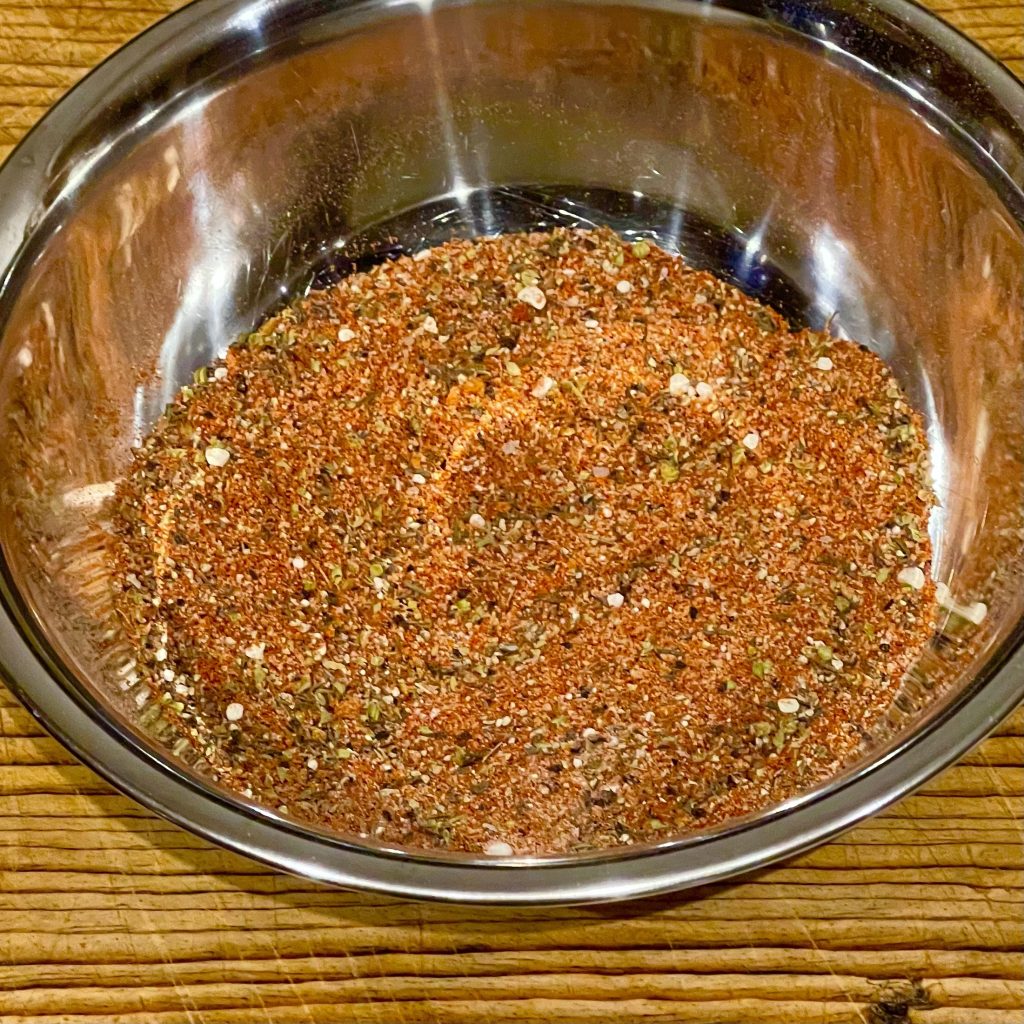
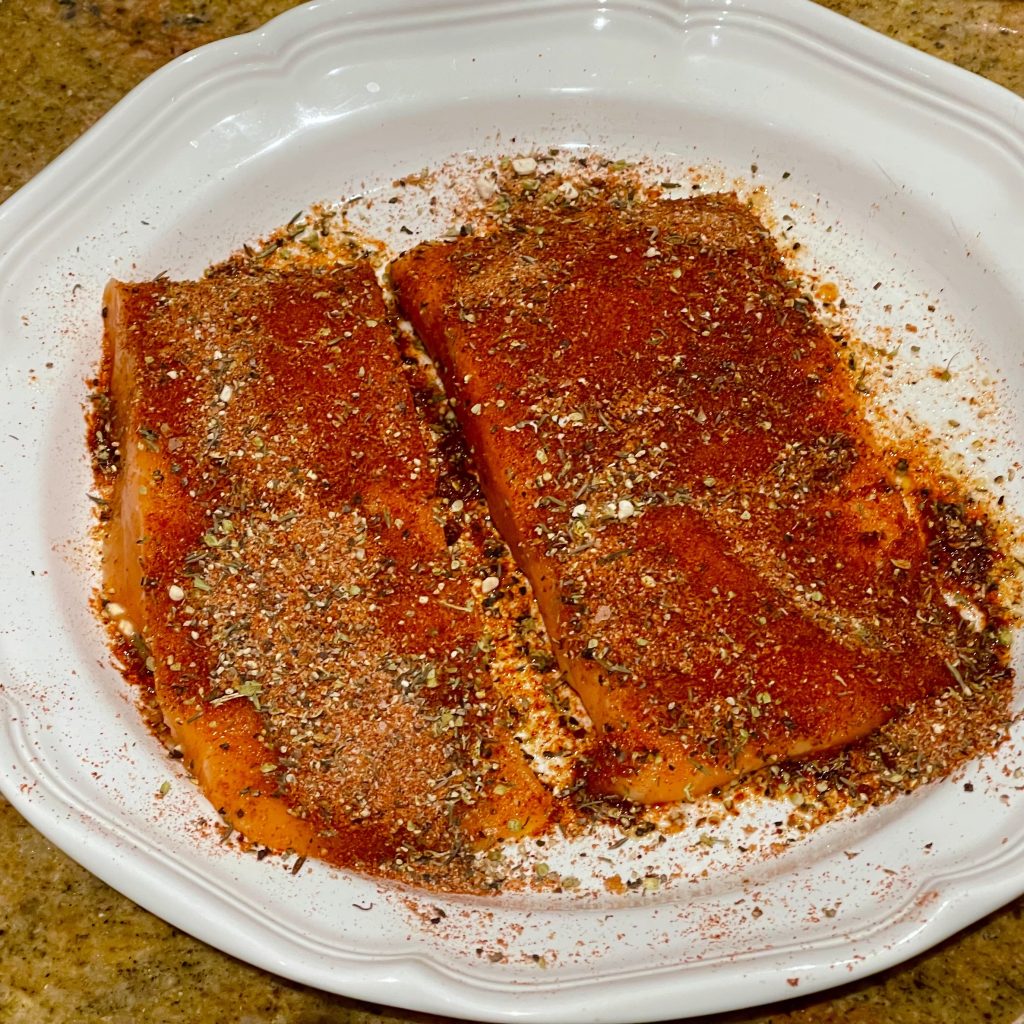
Mix all spices together. This should be enough for two dinners at least. I keep a spice jar of it in my spice drawer so I am ready to go at a moment’s notice.

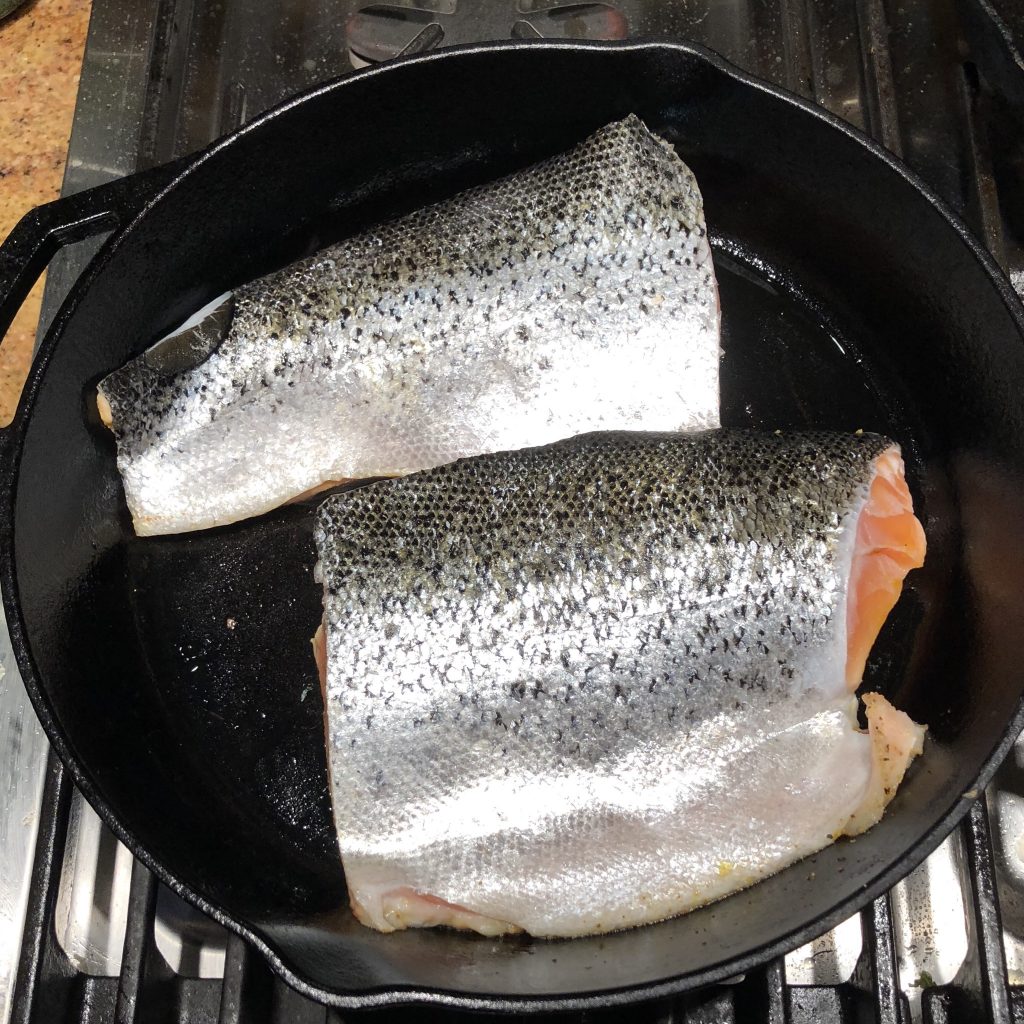
Coat salmon fillets with a little olive oil or butter, then spoon or shake spice mixture onto salmon. Press into the salmon to make sure it is affixed. Let sit for 10 minutes or so. Do not add additional oil or butter. You don’t need it!

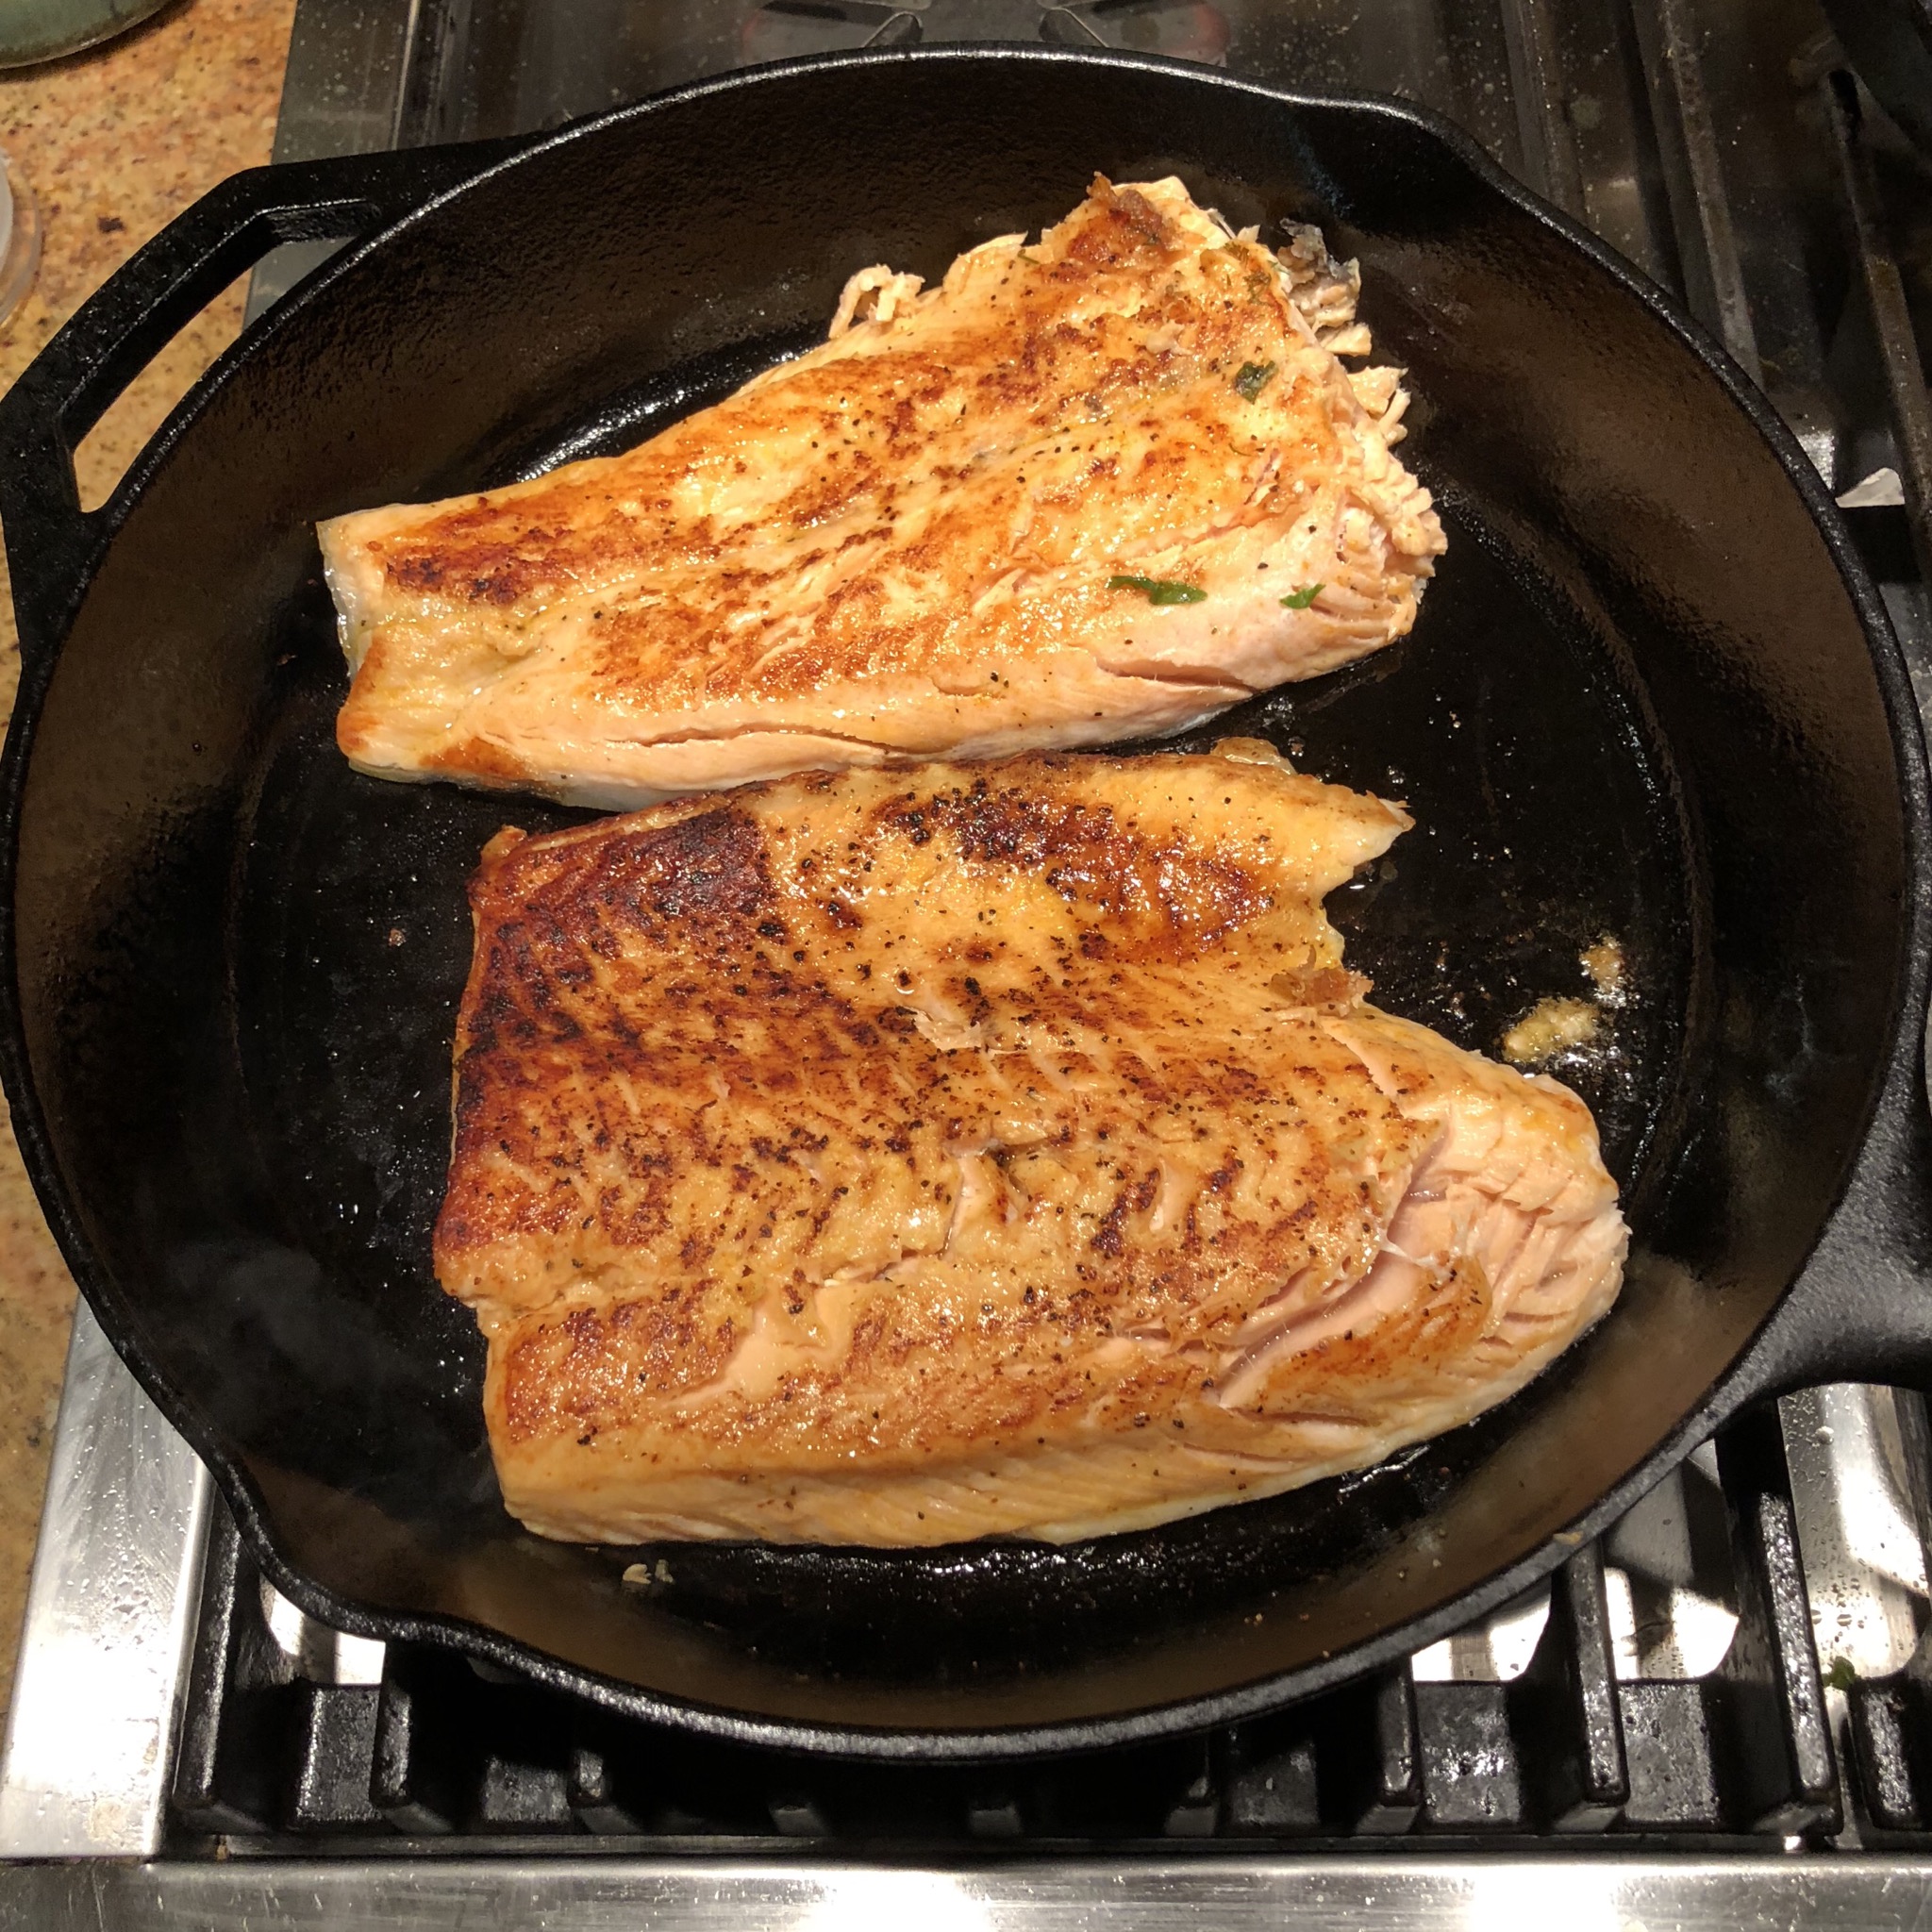
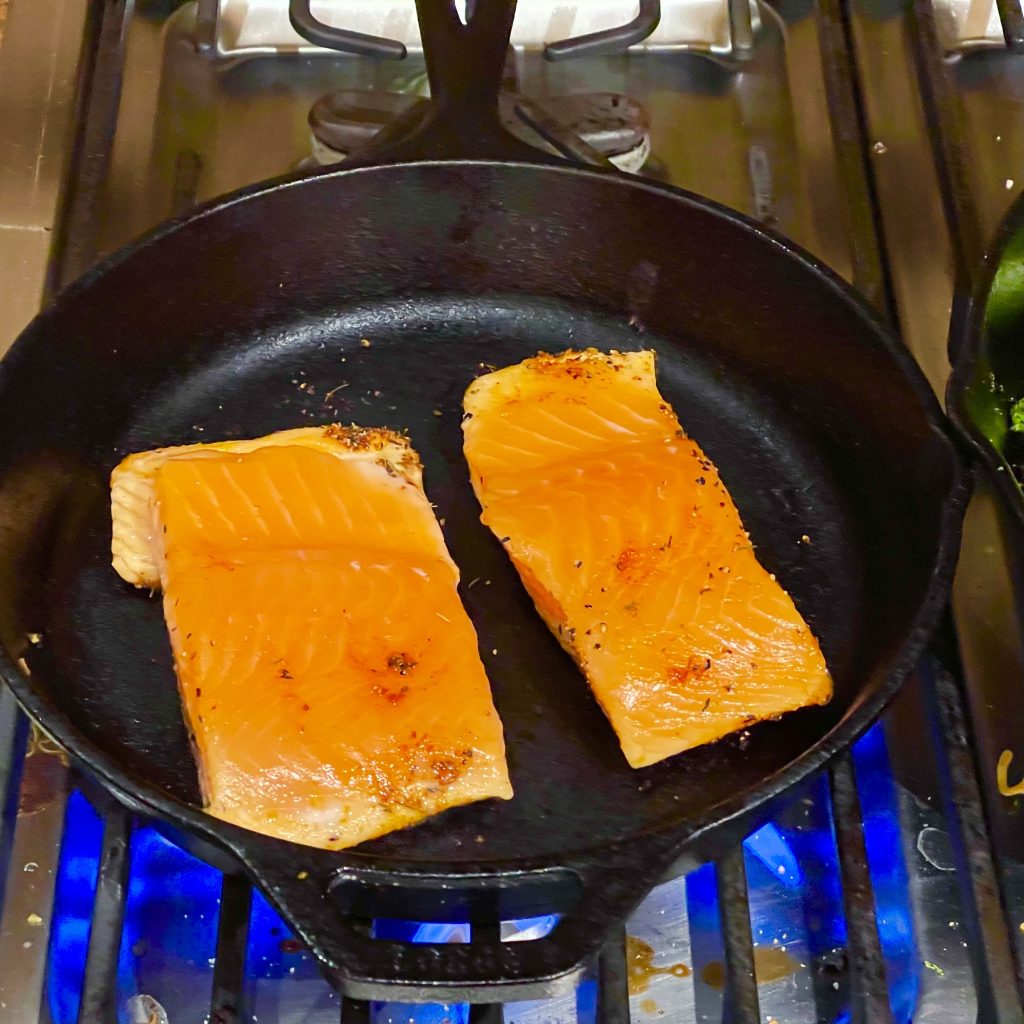
On your stove or on your outdoor grill, heat a cast iron skillet until it begins to smoke. Without adding any oil to the pan, place salmon, spice side down, into the skillet. You don’t need to press down. You don’t need to move it around at all. Let it sizzle for 4 minutes.

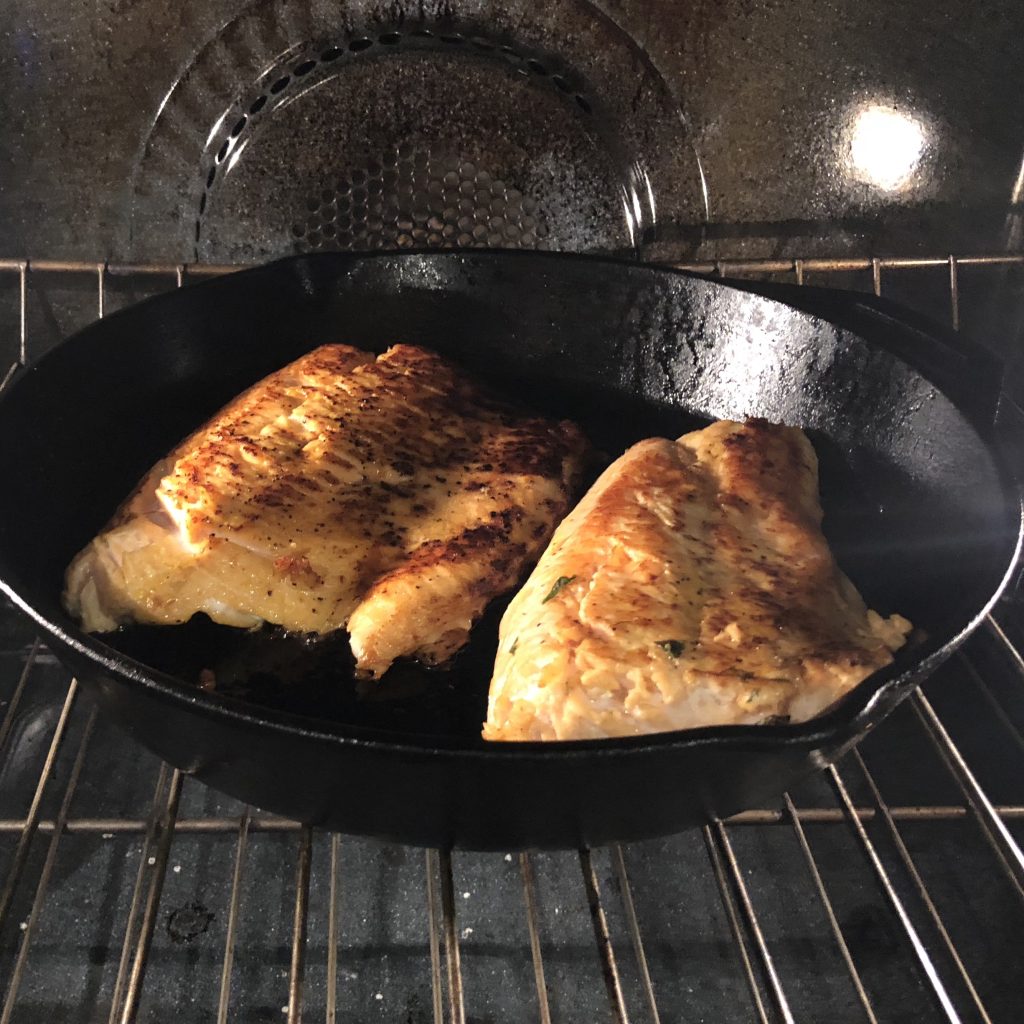
With a metal spatula, slide under the salmon, keeping the edge as close to the pan as possible, and flip each piece over. You are going to want to cook it until it is 130 to 135 degrees internal temperature. It’s probably another four minutes, depending on the thickness of the filets.

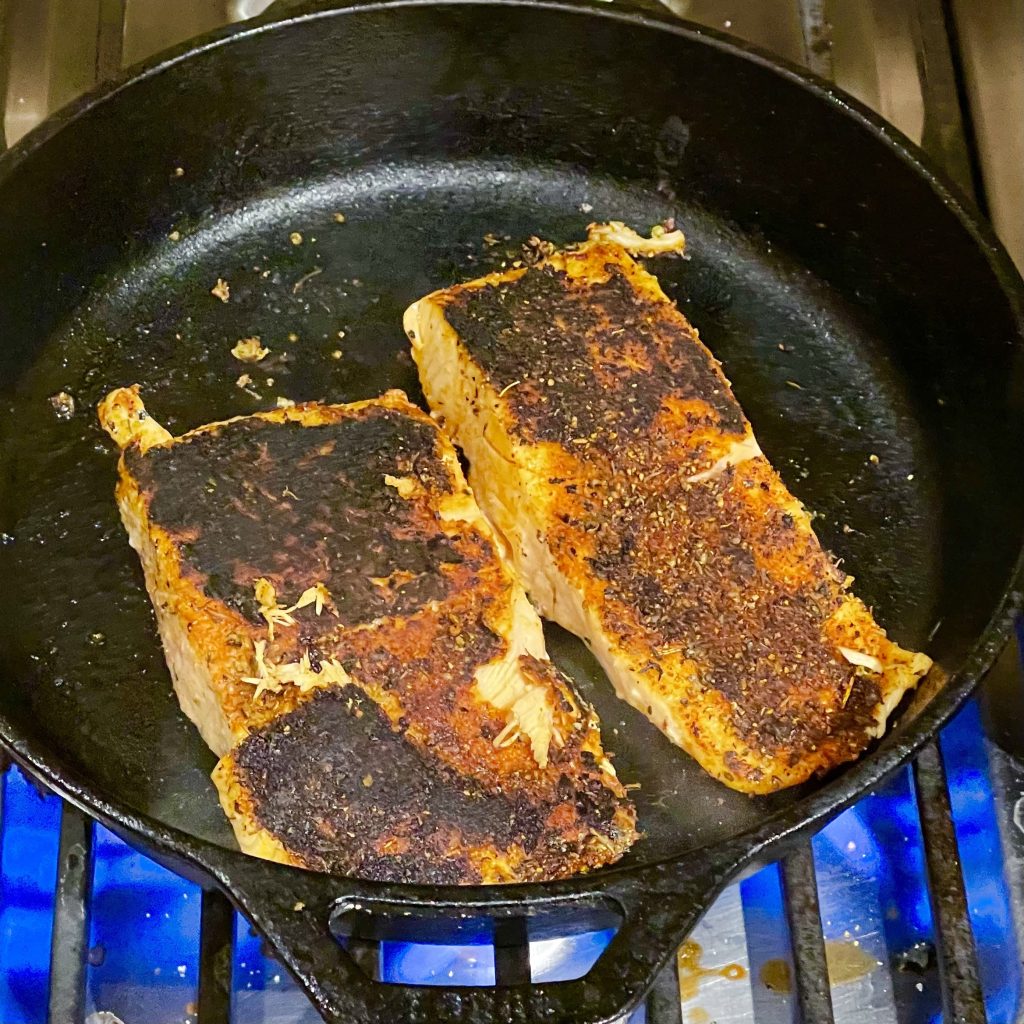
Plate the salmon, spice side up, and squeeze a lemon wedge over it, and serve. You will love it!

Biscuits with Black Pepper and Cheddar Cheese (or without!)

The Arkansas kid in me still loves biscuits. I have tried a variety of recipes, but now I have the one I’m sticking with.  Yes, it has an obscene amount of butter in it. But maybe you just shouldn’t worry about it for this one thing? I adapted it from Joanna Gaines Magnolia Table cookbook, and I just love it. The black pepper and cheddar cheese make them savory additions to breakfast, brunch, or dinner. You can make the dough ahead and cut the biscuits up to 3 days ahead, then pop them in the oven when you absolutely need to have them. I think you’ll love them!

Ingredients

4 cups All Purpose Flour
4 tbsp Baking Powder
1 tsp Baking Soda
1.50 tsp Kosher Salt (or 1 tsp regular salt)
2.50 Sticks Cold Salted Butter, each stick sliced into 8 pieces then quartered
2 Eggs, beaten
1.50 cups Buttermilk
1.50 cups Cheddar Cheese (or mix of Cheddar and Parmesan)
2 tbsp Black Pepper, Course Ground

Directions

Mix together all dry ingredients.

Add cold butter pieces.

Using a pastry blender (or a couple of forks if you don’t have that), blend the butter into the dry ingredients until the butter is in pea-sized pieces.

Add in shredded cheese and black pepper and stir in.

Add beaten eggs and stir in.

Add buttermilk and stir in, then mix with hands. It should be sticky, but not wet. Add flour or buttermilk to dry out or moisten. Refrigerate from 1 to 24 hours.

Spread some flour on a clean surface. Take dough out of the fridge and flatten with hands until you have a circle/square/rectangle/odd shape that is a little more than 1/2 inch thick.

Cut with biscuit cutter/glass/measuring cup/knife.

Cook at 400 degrees for 15-20 minutes, until tops are golden brown.

Take out and serve immediately! We you see how much butter goes into these, you know you don’t need to addd butter. But just a little bit won’t hurt, will it?

Fried Rice

Fried Rice with Egg.PS_

I love fried rice. For us, it’s not a side dish. It’s a one bowl meal. The key is thinking a little bit ahead and having some one to three-day old rice in the fridge. If you keep some shrimp (Trader Joe’s Argentinian) in your freezer, or if you have some crab (Costco) in your fridge, you are ready. Take stuff that’s already in your fridge, freezer, and pantry, add some cooked rice from the night before, and go out there and be a fried rice hero!

Ingredients

3 cups White Rice, Leftover and Chilled
1 Onion, diced
6 Garlic Cloves
2 tsp Ginger, Minced(I usually don't have ginger, or ginger paste, but it's nice when I do)
2 cups Diced Vegetables (Peas, Carrots, Broccoli, Celery, Anything you like!)
2 Eggs, beaten
cup Soy Sauce or Tamari Sauce for less sodium
2 tsp Sesame Oil
1 tbsp Black Pepper(That's not a typo – Black Pepper is KEY for this dish!)
2 Green onions, for garnish
3 tbsp Cooking Oil – Canola or Peanut
1 lb Cooked Crab/Shrimp/Sausage/Pulled Pork/Chicken/Tofu or anything leftover that’s tasty!

Directions

I start by making a super thin omelette, taking it off the heat, and slicing into 1/4″ slivers to mix in the fried rice later. Set aside or refrigerate.

Chop your vegetables!

Create your mixture – Soy Sauce, Pepper, Sesame Oil

Add 1 Tbsp Canola oil to wok or pan. Sauté Onions for five minutes, then vegetables for 5 more, or until they’re just the way you like them. Take out of wok or pan and set aside.

Put 2 Tbsp Canola Oil in wok/pan with heat on high. Add rice and let it sizzle for 4-5 minutes. Use a spoon or spatula to make sure it does not stick, but do not stir. You’re trying to make it a little crispy. Add soy mixture, stir, and mix well.

Add everything except the egg. Stir in and heat. Again, let sit instead of constantly stirring.

Blend in the cooked egg at the very end and serve! Have extra soy sauce and some Thai Chili Garlic sauce or Sriracha sauce for those who like it hot.

Skillet Apple Blackberry Pie

I adapted this recipe from the amazing chefs at Cooks Illustrated. It’s fun to use when you have fruit, and you ALWAys have apples and frozen blackberries. It’s super tasty, it’s easy, and it’s one more chance to showcase your cast iron skillet.

Ingredients

Fruit
6 Granny Smith Apples, peeled and cut into 1/2″ thick slices
15 Blackberries, or dried cherries, or something to mix well with the apples
Apple Cider Mixture
½ cup Apple Cider
cup Maple Syrup or Honey
¼ tsp Cinnamon
2 tsp Cornstarch
2 tsp Granulated Sugar
1 Egg White
Crust
1 Pie Crust (Pillsbury or homemade)
3 tbsp Butter

Directions

Melt butter in cast iron skillet. Throw in apples and start to sauté. Don’t over-stir.

Mix Cider, Honey or Syrup, Cinnamon, and Corn Starch together. Set aside.

As apples get close to ready, add blackberries or other fruit.

After 7-8 minutes, when apples have softened, turn off heat and gently stir in in cider mixture.

Lay crust over apples. Brush with egg white. Sprinkle sugar over the top. Sprinkle a little extra cinnamon if you like it as much as I do.

Bake in a 500 degree oven for 20 minutes. Let cool for at least 15 minutes, and serve with ice cream! Show off that cast iron piece or art before you start serving. You deserve the artistic credit!

Heather’s Crab Cakes

My friend Heather is well known as the person who does just about everything in our school district. She’s amazing at work, and to top it off, she’s a spectacular cook! This is one of her favorite recipes, and now that she’s shared it, it’s one of mine too.

Ingredients

Crab Cakes
2 tbsp Chopped Chives
1 tbsp Chopped Flat Parsley or Cilantro
1.50 tbsp Mayonnaise
1 tsp Grated lemon rind
1 tbsp Fresh Lemon Juice
1 Egg
cup Panko Bread Crumbs
1 lb Crab Meat, Lump is bestI try to always have at least one pound of the Costco Lump Crab Meat in my fridge. It lasts a long time, and I'm crab cake or fried rice ready at any time.
1 tbsp Blended Olive and Canola Oil
Spicy Mayo
¼ cup Mayonnaise
1 tbsp Chopped Chives or Shallots (but if you bought the chives, you might as well use them!)
2 tsp Creole Mustard (or Dijon Mustard with 1/2 tsp hot sauce)
1 tsp Fresh Lemon Juice
¼ tsp Cayenne Pepper (careful here, you may want to do it to taste)
tsp Salt
1.50 tbsp Capers (If you like them)

Directions

Mix together everything except the crab and the bread crumbs.

Add the crab and bread crumbs, mix together and set in the fridge for one hour.

While you are waiting . . . Mix all Spicy Mayo ingredients together.

Use a 1/3 cup measure, scoop out crab cakes onto plate or parchment paper.

Press out flat, then place in frying pan with just a little bit of olive/canola oil mix – 1/2 Tbsp. Sauté for 4 minutes.

Flip over and sauté another four minutes until golden brown.

Serve with lemon wedges and spicy mayo and enjoy!

Garlic Chicken

Having a variety of high quality chicken recipes is essential After I wrote that, I decided to add Yardbird to my categories list, just so I can see how many chicken recipes I have. This one is outstanding! So easy, so inexpensive, and pretty darn awesome! How can you not like it if if has garlic chicken gravy?!?

Ingredients

8 Chicken Thighs and/or DrumsticksAs many as you can fit in your large skillet!
Seasoned Salt
20 Peeled Garlic Cloves (I buy them pre-peeled)
3 tbsp Olive Oil
1 tbsp Butter
2 tsp Herbes de Provence
1 tbsp Flour
½ cup Chicken Stock (maybe more)
½ Lemon

Directions

Season Chicken liberally with Seasoned Salt – at least 30 minutes before cooking if you can. Salt does great things for poultry!

Heat Olive Oil and Butter in a cast iron pan (something that can go in the oven). Sauté whole garlic cloves for 5-10 minutes, until they turn light brown. Remove and set aside.

Place chicken, skin side down, for 5 minutes until golden brown on skin side.

Turn over and season with Herbes de Provence. Sprinkle garlic cloves over the chicken, then place whole pan in the Oven. (Note: If you are making a large amount, you can take it out and place in larger serving dish, and put that in the oven)

Baker for 30 minutes (at 350 degrees), or until meat temperature reaches 175. Remove from oven, and remove chicken and garlic from oil/butter/drippings. Place on serving dish.

Heat oil/butter/drippings. Whisk in flour. Add stock and lemon juice. Add more stock if you want it. Now you have awesome garlic chicken gravy.

Pour gravy over chicken and serve!

Skillet Cornbread

I love cornbread. Always have. I’ve gone through phrases in how I made it. My recipe for years was the Marie Calender’s mix, which was a little sweet, but so easy, and really, really good. Then, my mom made this recipe for me a few years ago. It is a non-sweet cornbread with a super crispy kissed-by-butter exterior. And on top of being the best-tasting cornbread I’ve had, it’s yet one more opportunity to utilize your cast iron skillet. Bring this to a pot luck or your own table and once again, you are a hero for the day!

Ingredients

1 cup Yellow CornmealI used Bob's Red Mill Brand Medium Grind Corn Meal
½ cup All Purpose Flour
1 tsp Salt
1 cup ButtermilkIf you don't have buttermilk, you can use milk with 1 lemon squeezed and set aside for 10 minutes, or 1/2 cup sour cream & 1/2 cup milk
½ cup Whole MilkLowfat is OK too. We're a whole milk family.
1 Egg
1 tbsp Baking Powder
½ tsp Baking Soda
1 tbsp Canola Oil
3 tbsp Butter

Directions

Mix Cornmeal, Flour, and Salt in a large bowl.

Add (without stirring) all remaining ingredients except butter and canola oil.

Hand stir (no mixer) and mix well with a large spoon. A few lumps are good. It’s not as thick as you think it should be – thinner than pancake batter – but that’s OK.

Place 9″ or 10″ cast iron skillet and in 450 degree oven for 5 minutes. It will begin to smoke.

Note: If you are doubling the recipe, a 12″ cast iron skillet is perfect.

Take the skillet out, then add butter and canola oil. Let the butter melt, then pour in the cornbread mixture.

Bake for 15-20 minutes at 450 degrees, until the top is brown and the sides pull away from the edges of the skillet. If you are a Thermapen temperature geek like me, the center should be at least 185 degrees.

Salmon – Cast Iron Skillet Style

This is one of my favorite ways to cook salmon. It’s so easy, and it looks fantastic. The key is the cast iron skillet, which starts on the stove, then finishes in the oven. The time on the stove makes it brown and beautiful, and the oven makes the fish perfectly done.

Ingredients

1.50 lbs Salmon Filet(s), Skin On
1 tbsp Olive or Canola Oil
Salt and Pepper or Lemon Pepper
2 Lemons, Quartered

Directions

Preheat oven to 425 (400 Convection)

Heat Cast Iron Skillet on high heat.

Prepare salmon. Coat with Olive Oil and season non-skin side with salt and pepper. Add some lemon pepper spice if you want.

When skillet is hot, place the salmon, SKIN SIDE UP, into the skillet.

After 5 minutes, turn Salmon Filet over. Move THE ENTIRE CAST IRON SKILLET WITH THE SALMON into the oven. 5 Minutes

After 6 minutes, take out of the oven, or when the salmon is 130 degrees, and it is ready to serve! 5 Minutes

Italian Veggies

My Sicilian friend and neighbor Antonio, who for years ran a great Italian restaurant here in Malibu, Tra di Noi, showed me such a simple way to cook vegetables.  He told me that most people overdo it by putting way too many spices in there, or they cook it too much.   His way is so simple and I love it. I’ve said it before, and I’ll say it again, salt is underrated. These sautéd veggies are flavorful and always a big hit.

Ingredients

4 cups Italian Veggies of your choice (Zucchini, Summer Squash, Onions, Green Beans, Broccoli, Cauliflower)You don't want to have many more veggies than your skillet can handle in one layer
Olive Oil
Kosher Salt and Fresh Ground Pepper

Directions

Clean and chop veggies to the size you want to serve them.

Heat up Olive Oil, Saute Veggies, adding salt and pepper along the way (more than you think of both); remove when they are the consistency you want. 10 to 12 minutes is a good amount of time.

With green beans, I will add some hot red pepper flakes. Having large chunks of onion (not diced) is also very good. And if you want more flavor, fresh minced garlic or dried minced garlic area always a nice addition.

Black Bean Veggie Burgers

I belonged to a 24 hour fitness gym back in 2007. I had a job where I drove all over Southern California, and I wanted to be able to work out wherever I ended up that day or night. So I was on their mailing list, and they sent out a newsletter with a recipe for a vegetarian black bean burger. I’ve adapted it a little, but it’s now my go to veggie burger. Jill loves them, and I do too. I recommend cooking them on a griddle or in a cast iron skillet. If you want to keep it all outside with the burgers you’re grilling, just throw that cast iron skillet on the grill and you’re good.

Ingredients

1 Can, Black Beans, Drained
¼ cup Onion, chopped
1 cup Salsa, thicker is better
2 Carrots, diced into smaller pieces (1/8″ pieces)
1 cup Bread Crumbs
½ cup Wheat Flour
1 Green Pepper, diced
½ tsp Salt
½ tsp Cumin
½ tsp Chili Powder

Directions

Preparing the patties

Steam carrots in the microwave for 90 seconds. Its enough to soften them up.

Mash black beans with a potato masher. Keep a few whole beans out, as they create better color and texture.

Add remaining ingredients (reserve 1/4 cup of salsa). Mix together. If it needs more wetness to hold, add more salsa. If it’s too wet, add bread crumbs or wheat flour.

Form 6 patties – 1/2″ thick is good. Place on wax paper on a baking sheet. Refrigerate until you are ready to grill ’em up.

Cooking!

I think these are best cooked on a griddle. Although you can grill them, it’s safer to cook them 3-4 minutes per side on a griddle. They should get just a little crisp on the outside.

Add cheese at the end of cooking if you want. Cover with a pot lid to help it melt faster.

Put on a bun, add your favorite ingredients, and you are living the vegetarian dream!