Not That Bad for You Banana Cream Pie

PieSlice

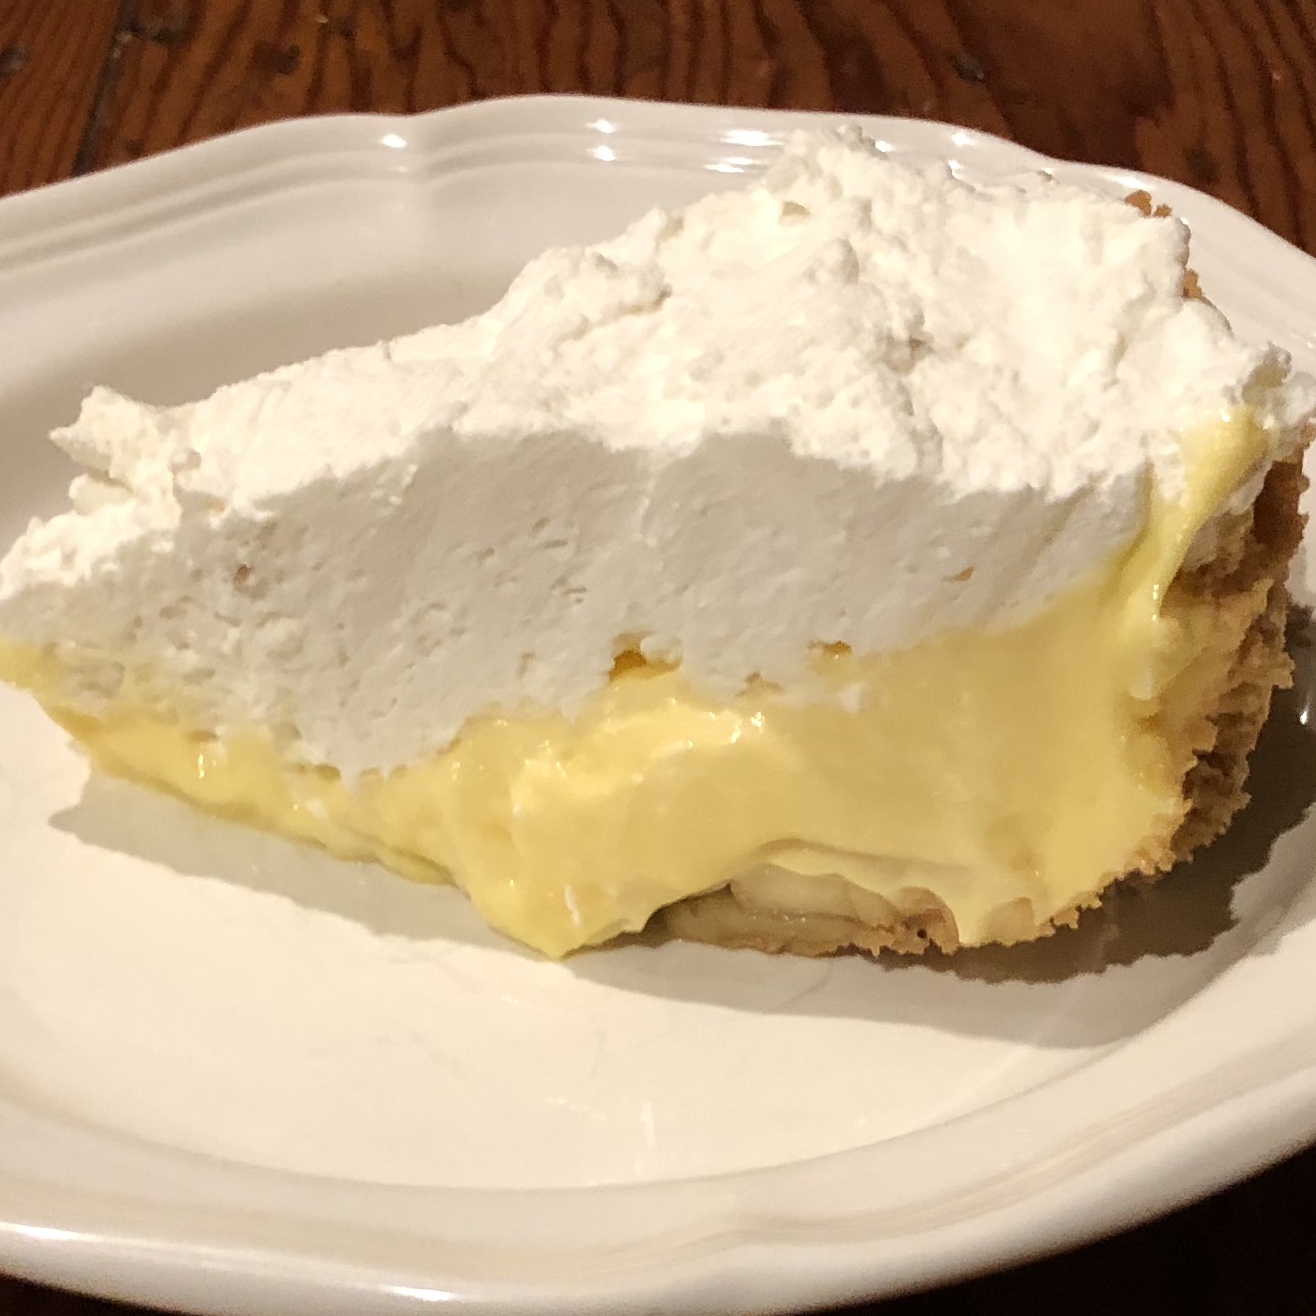
That pie shaped empty space that’s been in my life so long? It’s all good now.

When I was in my mid-forties, I remember telling Jill that I missed the days when I could eat anything and my weight just remained constant. I told her, “I was living the good life and I didn’t even know it.” Well, those days are long gone, but, to quote Joel Goodson’s dad in Risky Business, “Every once in awhile you just got to say, ‘what the heck’ and take some chances.” It’s a pretty sad testament to my risk taking at this point in life that banana cream pie is up there. But there you have it. I just have repeat my Stuart Smalley mantra, “I’m good enough, I’m smart enough, and doggone it people like me.”

Ingredients

Filling Ingredients
3 cups Whole Milk
3 Eggs Yolks
¾ cup Sugar, White Granulated
cup Flour, White
¼ tsp Salt
1.50 tsp Vanilla Extract
2 tbsp Butter
4 Bananas: 3-4 Large Bananas; 4-5 Small Bananas
Whipped Cream Topping
1 cup Whipping Cream
1 tbsp Granulated Sugar
1 tsp Vanilla
Graham Cracker Crust
1.25 cups Graham Cracker Crumbs
¼ cup Granulated Sugar
5 tbsp Melted Butter

Directions

Making the Crust

Mix Graham cracker crumbs, sugar, and melted butter in a bowl with a spoon. Placed buttered crumbs in a nice pie plate. (This pie deserves a nice pan!) Note: At some point, I’m going to try smushing a banana into this mixture. I’ll keep you posted!

With your fingers, press down the crust and do your best to make an even crust that pushes up the sides of the pie plate. Bake the crust at 375 for 7-8 minutes. Do not overbrown!

Making The Filling

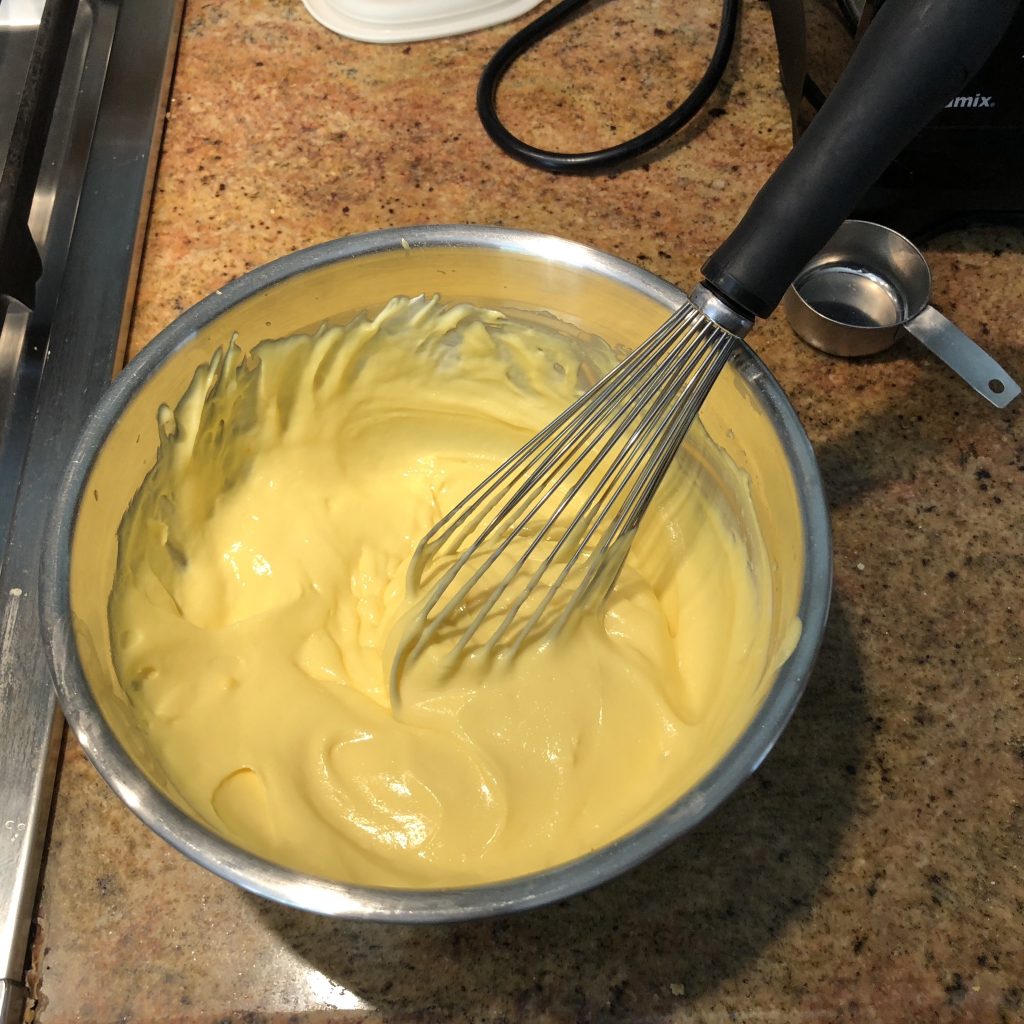
Pour 3 cups whole milk into sauce pan and scald. Stir to make sure it does not brown. Turn off heat.

Mix sugar, salt, and flour together. Slowly whisk into milk. Turn heat back on. Cook for five minutes, stirring regularly. The mixture will thicken and start to turn pudding-y. But you’re not done yet! Cover for two minutes over low heat, stirring occasionally.

Beat the egg yolks. Take a few large spoonfuls of the warm milk mixture, and whisk into the eggs. Whisk constantly to keep the eggs from cooking. Pour egg mixture into milk, whisking continuously. Mix in vanilla and butter as well. Cook for one more minute. Then turn off the heat and let it sit. Nice work!

You are ready to spoon this into the pie once it cools down to luke-warmish and not scalding hot. 120 degrees is just fine.

Whipping the Cream and Assembling the pie

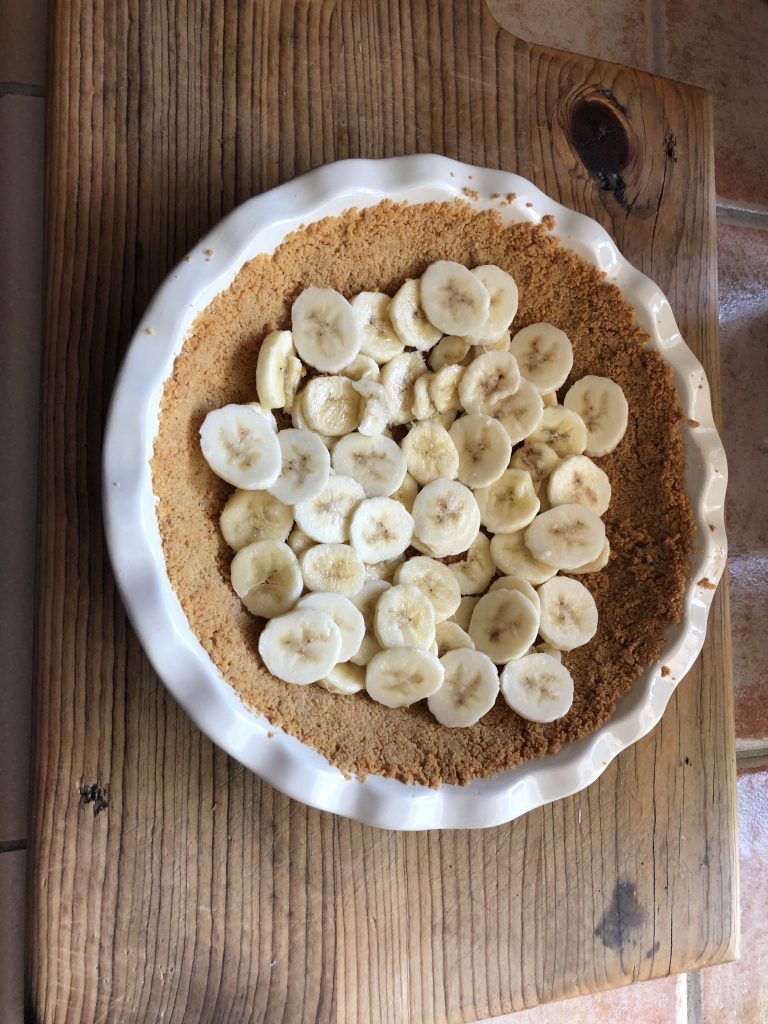
Slice bananas thinly – 1/4″ slices. I like a more banana-y pie, but go with your preference. Lay the 2/3 of the sliced bananas at the bottom of the pie.

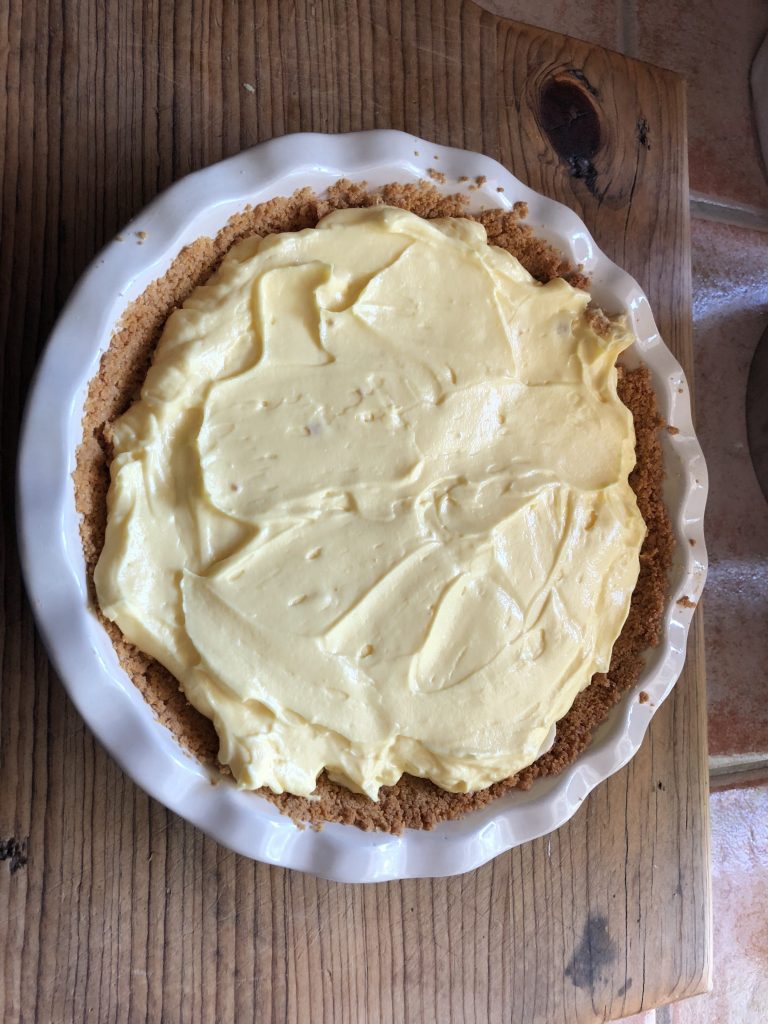
Spoon 1/2 of the pudding mixture over the bananas, spread the remaining bananas over that mixture, then spoon in the rest of the pudding. Chill. (Both you and the pie!)

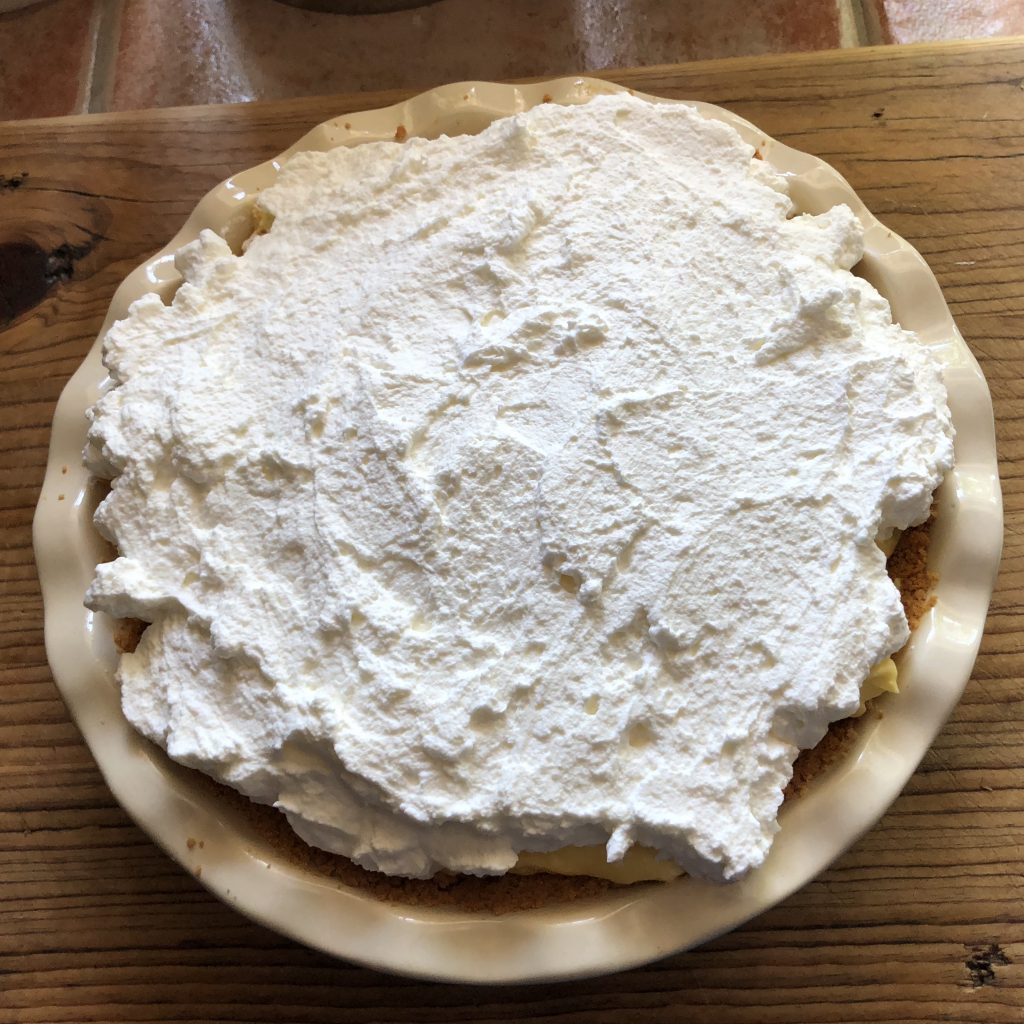
Using a Kitchen Aid Mixer or whatever you have, whip whipping cream, slowly adding sugar and vanilla, until solid peaks form. (Note: My next time I make this, I’m using the leftover egg whites to make a merengue. I’ll keep you posted)

Spoon whipping cream over pie filling and smooth out evenly. If you just use half the whipping cream, it does a nice job and saves you a whole lot of calorie guilt. Or . . . Go for it and use it all! Chill for at least two hours.

Cut beautiful slices and serve, immediately achieving hero status!

Ham on the Green Egg

Ham on the Green Egg is a perfect brunch food. It’s hard to screw up! The ham is already cooked. You’re just giving it some extra flavor and showing off your smoking passion and skill. This recipe is a perfect Easter Recipe. And if you don’t have a big enough crowd to finish the ham, you can freeze the leftovers in small bags, and use them in omelettes, quiche, and a wide variety of recipes. A little ham (or bacon) never hurts any recipe.

Ingredients

1 9-12 Pound Spiral-Cut Ham
½ cup Maple Syrup
Rub Ingredients
2 tbsp Maple Syrup
2 tbsp Black Pepper
2 tbsp Mustard (Whatever Style You Eat with Ham)
1 tbsp Bourbon
1 tbsp Vegetable/Canola Oil
1 tbsp Paprika
1 tbsp Kosher Salt
Glaze
¼ cup Maple Syrup
¼ cup Honey
½ cup Brown Sugar
2 tbsp Apple Cider Vinegar
2 tbsp Worcestershire Sauce
2 tbsp Instant Coffee
1 tbsp Dry Mustard
¼ cup Orange Juice
2 tbsp Bourbon

Directions

The Night Before . . .

Insert 1/2 cup maple syrup between spiral ham slices. Using a turkey baster works here, but you have to get your clean fingers in there to separate the slices.

Mix all ingredients for the rub together. Spread over entire ham. Tie up the ham with kitchen twine to keep the slices together.

Wrap in plastic wrap and refrigerate overnight.

Putting the Ham on the Green Egg

Heat the Egg or your smoker to 250 degrees.

Bring out the ham 30 minutes prior to adding to Egg. Add some soaked apple wood chips just before you add the ham.

Put the ham on the Green Egg! (I love saying that!)

Keep heating until you reach an internal temperature around 120 degrees. This should take a little less than an hour.

Finishing it Up!

Mix all glaze ingredients together. Heat in a sauce pan or microwave to mix.

After the ham reaches 120 degrees. Start basting every 15 minutes with the glaze.

Take it off the egg at 145 degrees. Cover tightly with foil until ready to serve.

Ham on the Green Egg.

Disneyland Turkey Legs (aka Caveman Pops)

Caveman Heaven

My family loves Disneyland. They go several times a year, and if we lived closer, they’d go more. I go once a year and enjoy myself immensely. But . . . I don’t need or want more than that. What I do love about Disneyland, and if I lived closer might be worth the price of an annual passport, is their high quality turkey legs. Caveman Pops. I love a good meal on a stick, and this is the mountaintop of such meals. This is my attempt at reaching the Caveman Pop Summit. Enjoy!

Ingredients

4 Turkey Legs – Medium Sized to Large. These are easy to find at Thanksgiving, but you may have to ask your butcher ahead of time other times of the year.
¼ cup Arkibu Rub , or other BBQ Rub
½ cup Honey

Directions

The night before you want to cook these, rub them with Arkibu BBQ Rub.

Fire up the Big Green Egg, or your favorite indirect heat smoker. I put it to 300 degrees. Prepare some apple or pecan wood chips by soaking them in water.

Add chips, lay turkey legs on the grill, and smoke until they are done. Time will depend on the size. 40 minutes to a little over an hour. Use your Thermapen. Take it off when the bottom thinner meat starts to separate from the bone, and when the meat is 180 degrees.

Place in a casserole pan or something and cover with foil until you close to being ready serve. Remember – for food to be safe, don’t let it sit if it’s under 140 degrees.

When you are ready to serve, coat each leg with a lot of honey, brushing it all over the meat.

Fire up a direct heat grill (I use my Weber Genesis Grill), spray some cooking spray on it, and sear the honey-coated goodness in, about five minutes per side.

Caveman Heaven

Wrap each leg in foil, and serve when you are ready!

Roasted Brussels Sprouts

img_6721

“OK, OK. Quit wrinkling your nose. This is good stuff.” That’s what I wrote when I first published this recipe. Then, restaurants everywhere started serving really awesome brussels sprouts. They saw what I saw. They are a fantastic dish, royalty in fact, worthy of the Thanksgiving table and great for any meal. This is how we make them. We love them!

Ingredients

2 lbs Brussels Sprouts, washed, ends cut off, and split
2 tbsp Olive Oil
½ tsp Salt, Pepper, Herbes de Provence (1/2 tsp of each)Don't be shy with salt. It is underrated.

Directions

Preheat oven to 400. (375 Convection)

Place washed, cut, and split sprouts in large bowl. Add Olive Oil, toss, and coat.

Spread on baking sheet. Sprinkle spices over them.

Bake for 20 minutes or until browned. Turn at least once while baking. Taste for salt to see if you need more. (I treat the sprouts like french fries – they’re pretty darn good with a good dose of salt).

If you want to increase taste while reducing healthiness, take your perfectly cooked brussels sprouts, and sauté them in a butter/garlic/capers sauce. 4 ounces of butter, 4 garlic cloves (crushed), and 1 Tbsp of capers. I recommend it!

Cheese Grits

grits-sprouts-dressing

Growing up in the South, you didn’t ask for grits at a breakfast restaurant. They just came with the bacon and eggs. They are a cheap and filling food, and have just been part of southern menus for a long time. I do not crave grits. But cheese grits, that’s a different story. My mom always made cheese grits. They’re way better than just grits, far beyond ordinary, and deserving of a special place at the table.

Using non-instant grits is critical. If you are an oatmeal fan, then you should not be a fan of instant oatmeal. Instant oatmeal is a bunch of nothing. Steel cut or the whole grain oatmeal, the stuff that takes at least 10 minutes to cook, is the way to go. Same thing with grits. Get yourself some good stone ground grits (my favorite brand is Bob’s Red Mill), and you are ready to go. We serve this for dinners, pot lucks, and it’s even a staple on our Thanksgiving table.

Ingredients

1.50 cups Stone Ground Grits*We love Bob's Red Mill brand for all of our grains. See amount note in the directions. You want the right amount of grits to mix into six cups of water.
6 cups Boiling Water with 1 tsp saltYou can use a vegetable or chicken stock if you want more flavor.
4 cups Sharp Cheddar Cheese, grated
3 Eggs, beaten
8 tbsp Butter (1 stick)
2 tsp Kosher Salt
2 tsp Pepper, Black
1 tbsp Chili Garlic Sauce (Optional)

Directions

Cook the grits in boiling water until they reach a consistency where they won’t run off your plate and turn off heat.

Note: different grits have different measurements. Choose the right amount of grits to cook in 6 cups of water. Use some Common Core math skills here!

Add butter, and stir in until it is melted and blended.

Beat eggs in a small bowl, then spoon in some of the hot grits into the eggs and mix together (this keeps the eggs from cooking into scrambled eggs). Add back to grits and stir.

Mix in all but one cup of the shredded cheese.

Stir in salt, pepper, and if you want some spice (and you should!), the chili-garlic Sauce or your favorite hot sauce.

Prepare a nice casserole dish. A 13″ x 9″ size (3 quarts) is right. If you are using a deeper dish, you will need to bake a little longer. Use some butter or cooking spray and you’re set.

Pour the grits into the dish. You can refrigerate overnight at this point, or just go right to the next step.

When you are ready to bake, sprinkle cheese on the top. Bake at 350 degrees (325 convection) for 1 hour and 15 minutes, until just barely browned and the grits are set. 75 Minutes

Jilly’s Mini Pumpkin Pies

Once the Halloween Tree goes up, it’s time for Jilly’s Mini Pumpkin Pies! My wife Jill is an inventor. She has invented so many things over her life, the smartphone for example. She was way ahead of Steve Jobs. In 2003, long before the first iPhone in 2007, when she was holding her Treo 300 Palm Pilot in one hand, and her cell phone in the other, she knew they should be merged as one. We don’t make a lot of money off of her inventions, but we enjoy it when someone else finally figures it out.

These mini-pumpkin pies may be one of her greatest inventions. A friend of ours published the recipe in a cookbook, but did not give Jill credit. She’s OK with that, but come on! I bet we make five or six batches of this every fall. They’re a great dessert, breakfast, snack, or whatever you want them to be.

And here’s how I eat them. I peel away the muffin liner, hold the mini-pie in my hand, put whipped cream on top of that, and eat it in three bites. Let us know what style works best for you!

Oh! And that picture below? That’s Jill getting the honor of putting the witch on top of the old Halloween Tree! Wait. You don’t all do that? Our holiday tree comes out in October and becomes a Halloween Tree, then a Thanksgiving Tree, then a Christmas Tree. And if I had it my way, it would stay up the whole year long, arborally celebrating the different holidays. Alas, like many things in my home, I don’t get it my way, and I live with nine, sad, holiday treeless months. But I can’t wait for October!

Ingredients

1 14.5 oz Can Pumpkin – We Like Libby’s
1 Can, Sweetened Condensed Milk
2 tsp Pumpkin Pie SpiceWe think McCormick's is the best brand for this
2 Eggs
28 Ginger SnapsThe Nabisco Ginger Snaps are perfect.
Whipped CreamI usually like homemade, but the spray can works so well here.

Directions

Mix pumpkin, sweetened condensed milk, pumpkin pie spice, and eggs in a mixer or with a spoon.

(Note: If you want to make a big pie, just pour this into a pie crust and bake at 425 degrees for 15 minutes, then 350 degrees for 30-40 minutes, until a knife/toothpick comes out cleanly.)

Put a Gingersnap in the bottom of 28 foil cupcake cups arranged on 8.5 x 13 casserole dishes. Put 1/4 cup mix in each cupcake cup.

Bake at 425 for 15 minutes, then at 350 for 20 minutes.

Let cool. Then serve with whipped cream!

Chocolate Pecan Pie

Chocolate

This is one of my all time favorites, combining southern pecan pie and chocolate. How bad can that be? It is really, really rich, and I like it best served a little warm with some whipped cream.

Ingredients

2 tbsp Butter
3 oz Unsweetened Chocolate
2 tbsp Flour
½ tsp Salt
3 Eggs
1 tsp Vanilla
¾ cup Sugar (White)
2 cups Pecan Halves
1 cup Dark Karo Syrup

Directions

Prepare the crust. To make it easy on yourself, you can use refrigerated crusts, which are a distant but still good second. To make a great homemade crust, use Martha Stewart’s awesome recipe .

Spray cooking spray in a pyrex measuring cup or microwave safe bowl. Microwave chocolate squares for 3 minutes or until they are melted. Watch the microwave carefully. Don’t let it keep going after it melts.

Add butter to melted chocolate. It can melt by itself or you can microwave it another 15 seconds.

In separate large bowl, mix sugar, salt, and flour. Stir in eggs and Karo syrup. Add Chocolate/Butter Mixture. Add Vanilla and Pecans and mix together.

Pour into pie shell. Bake at 350 for 60-70 minutes, until it slightly browned on top and a knife comes out clean.

Smoked Turkey

bge-turkey

It’s easier than ever to add smoking to your outdoor cooking abilities. And with the right equipment, you don’t have to devote a whole day to the effort. I used to have to tend my $100 offset smoker every 30 minutes. It was tricky to keep the temperature right and the results were inconsistent. If you know this site, you know that I love my XL Big Green Egg. It holds the temperature like a champ, but it takes a little work to get it going, but once you do, it’s a rock and needs little to no attention. And the results are fantastic. But there are easier versions – the Traeger and its copycats are even easier. Plug it in, flip a switch, and you’re smoking. If you like smoke flavor, find your right fit and make it happen.

This is just like the Roasted Turkey recipe, but better. A real smoker is just like an oven. A lot of people believe in “low and slow,” where the temperature is 225 or 250, and it takes a long time. That’s a great strategy, but I like to smoke a turkey just like I do it in the oven. Same temp, same time, but a way different flavor.

Ingredients

Everything from the Roasted Turkey Page Make sure the turkey will fit in your smoker!
1 cup BBQ Rub. Choose your favorite or go with my Arkibu Rub .

Directions

Instead of dry brining the turkey, rub the turkey with the BBQ rub. There’s plenty of salt in that to do the work. Let sit for 24 hours.

Instead of preparing the oven, prepare the smoker. For me – it’s the Big Green Egg. Use the same temp as the Roasted Turkey Recipe – 320 degrees. Apple wood chips are outstanding.

Add apple wood chips, and Smoke until the breast temperature reaches 165. There’s no basting.

Roasted Turkey

It’s time to turk the cookie! That’s what my mom, the infamous “Gramma Sue” who is mentioned in so many of these recipes, would say every Thanksgiving morning. It was a mistake the first time, but she was kidding after. I think.

In our Thanksgivings, we do one smoked turkey and one roasted turkey. Jill, even those she’s vegetarian, loves cooking the roasted turkey, and it always comes out great each time. This is how we do it.

Ingredients

1 Turkey (16 – 22 pounds)
1 cup Butter (2 Sticks)
1 cup White Wine or Champagne
2 Onions
2 Oranges
1 tbsp Thyme
2 Stalks celery
1 tsp Black Pepper
8 Good Chicken Broth

Directions

Make sure the turkey is thawed!! To be safe, a frozen turkey should thaw for five days in the fridge.

If you have time, brine your turkey. It makes a big difference. I do a dry brine now. Here are the two ways you can brine:

If you have time. Do a three-day dry brine. It’s retty easy really. Take a combination of 2 Tbsp Kosher Salt and 1 tsp Herbs de Provence (or Italian Seasoning if you don’t have the French Stuff) for every five pounds of tukey. And rub the inside and outside of the turkey with the mixture. Put it in a turkey oven bag and keep it refrigerated for 3 days.

If you only have one day – Do an overnight soaking brine. My Aunt Catherine gave me this recipe. Add 1/2 cup salt and 1/4 cup sugar for every gallon of water. You can add lemon or orange slices if you like. She adds 4 cinnamon sticks and a handful of cloves. I don’t do that, but if that sounds good to you, go for it. In a large container, soak the turkey in the brine for at least one full day.

About an hour before you are ready to cook, take the brined turkey out of the fridge. Wash the turkey under running water. Take out the neck and giblets and reserve for broth.

Fill the cavity lightly (don’t stuff it) with a quartered onion, a cut up stick of butter, and some quartered oranges. Smear the turkey with softened butter, sprinkle top with salt and pepper, and cover with a cheesecloth. Yes, I know, it’s a lot of butter. It’s Thanksgiving – give yourself permission!

Preheat the oven to 300 (convection) or 325 (normal).

Make a mixture of the remainder of butter (melted) and the white wine or champagne. Use the cheap stuff! This is for basting.

Place in a Roasting Pan on a rack, and cook for 10-12 minutes per pounds.

Note – Time this out. For me – I plan on 12 minutes per pound (it is usually more like 10 in my oven) plus 30 minutes, and then it’s dinner time. So it you put a 20 pound bird in at 9:00 AM, it takes 240 minutes (4 hours) to cook, and I’m ready to serve any time from 1:30 to 2:30.

Baste the turkey every 30 minutes, using the wine/butter mixture at first, then using the turkey’s own drippings.

When the breast meat temp reaches 165, and/or the leg temp reaches 175, take the bird out, gently take off the cheesecloth, and let it rest for at least 30 minutes and for up to two hours. If you’re going to wait over an hour, cover loosely with foil.

Making the Gravy!

While the turkey is roasting, Put the neck and the giblets (my father-in will eat giblets all day) in a sauce pan with 6 cups of water, 2 celery stalks, 2 carrots, thyme, a bay leaf, black pepper, and you’re off.  Cook for 2 hours, then strain. 

Save the broth for the gravy.   Cut up the neck meat for the gravy.  We use just the neck meat and let my father-in-law take care of the giblets – not everybody likes them! Throw away everything else. Put the broth and meat aside for later.

After the turkey is done, take the bird out of the roaster and let it rest. Skim the fat off of the top of the turkey drippings. I cheat on this one. My in-laws gave me a “fat separator” that is very easy to use. I pour the broth into it, wait 5 minutes for it to separate, and pour the fatty drippings back into the pan.

Take the turkey pan with all of the fat-reduced drippings and place it on the stove. Heat, then slowly whisk or stir in 1 cup of flour, making a nice roux.
Note – If your roaster pan won’t go onto the stove, then use another pan. It’s no problem.

Slowly add the broth that you made, whisking or stirring it into the roux. Add extra broth if you need it until you have a thick, beautiful gravy. Taste and add salt if needed. Add the cut up giblets if you want. See thickening notes below.

The gravy is ready!

Carrot Souffle

Carrot Soufflé is a great alternative (or addition) to sweet potatoes at Thanksgiving.  It’s sweet, almost dessert-ish, and it adds great color to any plate.  And . . . you get to say you’ve eaten your vegetables! My mother-in-law brings this to our home every Thanksgiving, and there are never any leftovers.

Ingredients

1 lb carrots, peeled and ends cut off
3 eggs
cup granulated sugar
3 tbsp white flour
1 tsp vanilla
cup butter, melted

Directions

Preheat oven to 350 degrees.

Boil water, cook carrots for 8-10 minutes, until soft. 8 Minutes

Place all ingredients in a food processor. Puree until smooth.

Pour into baking dish – a 1.5 quart soufflé dish or pan is nice – and bake at 350 degrees for 40 minutes. Use the “knife in the cake” technique, if it’s clean, it’s ready. 40 Minutes

Optional topping: Mix 2 Tbsp soft butter, 2 Tbsp Brown Sugar, and 1/2 Cup chopped pecans to the top after you take it out, broil for 3 minutes until brown. This is too sweet for my tastes for a meal, but I still think it sounds awesome!

Spicy Cranberry Sauce

img_6620

I started working on a spicy cranberry sauce back in 2010, and I really like this recipe that is an amalgamation of many ideas. It’s a hit on Thanksgiving and great with leftovers, and it just takes a little time. It’s not that spicy, and it tames with time. I hope you like it!

Ingredients

12 oz Fresh Cranberries
14.50 oz Can, Whole Berry Cranberry Sauce
12 oz Orange Marmalade
1 Onion, Small, diced
1 Apple, peeled and diced
1 Green Pepper, Cored, and Diced
2 diced jalapeños (2 peppers)
1 lime, juiced and zested

Directions

Mix it all together in a saucepan over medium heat.

Cook for for two to three hours, until the consistency starts to feel a little thick and the cranberries have cracked open. 120 Minutes

Refrigerate overnight and you are set!

Granny Catlett’s Dressing

Granny Catlett was my cousins’ grandmother. I would see her quite often, as we lived just two doors down from our cousins, Kathy, James, Joe, and Helen. My brothers and sister (there were four of us too) were always at their house getting into some kind of mischief. Granny Catlett was kind and wonderful, always quick to smile, and she was a great cook. This recipe came out every Thanksgiving. Actually, there were two versions – this one, and the one with oysters mixed in. It was a bad day when you chose poorly. Everyone in my family who cooks uses this recipe – and this recipe makes no mention of oysters.

I think this is one of the many powers of cooking for people. These recipes are way more than chemistry. They are stories, they are memories of friends and loved ones, and they make us slow down and remember. That, my friends, is a good way to live.

Ingredients

7 cups Cornbread (Make the night before if you want)
7 cups White Bread, slightly toasted
1 Bunch of Celery
1 Onion (Small – Use half if you’re not a big onion person)
4 cups Organic Chicken Broth
½ cup Butter (1 Stick)
4 tsp Salt
2 tsp Pepper
1 tsp Poultry Seasoning
2 tbsp Sage
2 Eggs (Beaten)
1 cup Milk

Directions

Make cornbread the night before. Crumble 7 cups of cornbread and place into large bowl.

Slightly toast 1/2 loaf of white bread. I use my oven for this. Just put the bread right on the racks and heat for 3 minutes at 350. This dries it out. Crumble 7 cups (just break and tear) and add to large bowl.

Sauté chopped Celery and Onion in the butter. Get it nice and soft.

Add all of the seasonings. Give the whole mixture a few gentle stirs to mix it up.

Add onion and celery, and everything else into the large bowl! It should be thick, pouring in large globs. Add broth if it’s too thick. Add cornbread if it’s too runny.

Bake at 350 degrees for 45 minutes, or until it’s slightly brown on the top and a little crispy.

Note: You can prepare this the day before (no baking) and refrigerate it overnight. Take out of the fridge one hour before baking.